How to Make a Gumpaste Teacup
The process for making a gumpaste teacup is a simple one. Howevee, it does take some time; so if you need a teacup for a cake tomorrow, you may want to rethink your design. The gumpaste will be very fragile until completely dry, so allow yourself several days to complete the cup.
Supplies Needed:
Gumpaste
Paper Pattern
Fondant Roller and Mat
Cornstarch
PME cutter
Ball tool
Scissors
Palette knife
*Gum Glue
Brush for applying gum glue
China Cup for Molding
Instructions:
Method #1.
When using a china cup with an edge at the base, use the following instructions.
1.Start by using a cup with a large bowl. If your teacup has too steep of a slope, your gumpaste may
have a tendency to slide down. Measure the circumference of the top rim of the cup. Apply a liberal amount of cornstarch inside the cup. Set aside.
2. Cut a parchment paper pattern using the pattern guide above.
3. Dust your mat with cornstarch. Using a firm gumpaste, roll out until thin ( not paper thin, but so that you can see the shadow of your hand when you hold up to light).
Lay your pattern over the gumpaste, and cut along the lines of the pattern using your PME cutter. Lift to make sure your gumpaste does not stick to the board.
4. Dust the board again. Then applying pressing on the long curve of the fondant, began rolling to create more length. This is much like the process of sewing a flounce. Measure now to make sure that you have enough length to reach the circumference with a 3/8" overlap.
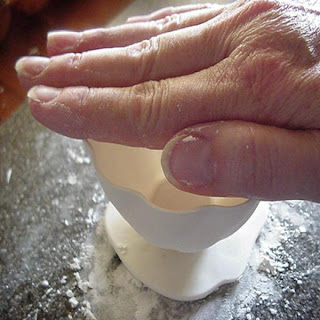
5. Lay one edge of the fondant in the cup lined up directly with the handle on the outside. Gently press the fondant into the cup.
Smooth the fondant into the cup and lay over the top edge. Secure the overlap with a light amount of gum glue. Using your PME cutter, cut the excess from the bottom edge of the cup, then smooth raw seam with a ball tool.
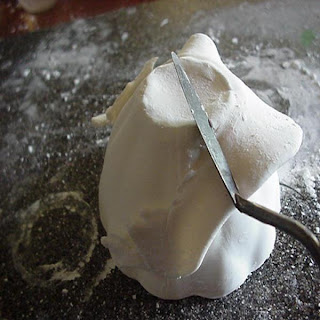
6. Cut most of the excess from the top of the cup using scissors. Carefully lift the gumpaste to assure it is not sticking to the cup. If it is, gently lift the gumpaste, apply more cornstarch and reset the gumpaste into the cup.
Using a palette knife, trim the edge of the gumpaste to the cup. Carefully lift the gumpaste again and set back into the cup to assure it is not sticking.
( This is an important step. If your gumpaste sticks to the cup, it will break when trying to remove it after it is dry. For the first couple of hours check to be sure it is not adhering to the cup. Be extremely careful with the edge of your gumpaste during this process)
Allow to dry completely. Once cured, you can handle the cup without fear of it breaking easily.
7. When your cup is dry, roll out 1/4" cornstarch on your board. Lightly brush the bottom edge of your cup with gumglue. Press into the gumpaste.
Pick up, turn over and gently trim excess gumpaste with your palette knife.
Smooth inside of bottom using your ball tool.
Once dry, you can spackle any imperfections with royal icing if you like.
**~~~~~~~~~~~~~~~~~~**
**~~~~~~~~~~~~~~~~~~**
Method #2
If you are using a cup with a bowl and no edge where the inside of the cup meets the bottom, you will use this method.
1. Begin by generously applying cornstarch to your cup and board.
2. Roll the gumpaste out very thin in a large circle.
3. Lay over the cup and gently begin smoothing gumpaste into the cup. Don't hurry this process or you will get a crease at the edge.
If your gumpaste doesn't meet the bottom, don't fret.
Gently smooth the gumpaste toward the bottom of the cup and
it will eventually rest into the cup.
4. Cut the edge of the gumpaste with scissors, gently lift away from the cup, then set back in. Using your palette knife, trim the gumpaste to the edge of the cup.
Gently lift the gumpaste to assure it is not sticking to the cup and lay back inside.
Allow to dry completely.
Allow to dry completely.
5.When dry. Roll out a 1/4" sausage of gumpaste about 3 inches long. Moisten one edge with glue, the press edges together, creating a 1" circle.
6. Moisten top edge of circle with gumglue and set the cup on top to create the base of your cup.
7. Check to be sure your cup is setting level, then leave upside down to dry completly.
Making and Applying the Handle
Making and Applying the Handle
8. While your cup is drying, make a handle using the pattern as a guide, or you can create your own handle design. Lay in a cornstarch bath to dry.
9. Mix a very small amount of gumpaste with your gum glue to make a soft paste. Using this paste, attach the handle to the cup.
10. Set aside and allow to dry completely. When dry, you can decorate your cup using petal dust mixed with everclear.
* to make gumglue mix 1/4t Tylose with about 2 T. hot water. Keep in a small sealed container.
*************************************
* to make gumglue mix 1/4t Tylose with about 2 T. hot water. Keep in a small sealed container.
Mostly just have fun with it.... Remember-- sugar is supposed to be fun!!
Photos and Tutorial by Jacque Benson 2007 all rights reserved.
This material may not be republished or reproduced in any manner without the expressed permission of the author.


